Long Overdue
3 mins
I really need to update this blog more often, if only to remind myself of what I’m up to!
So this is hopefully the first of a few posts over the next few weeks…
In December the newest member of my family will arrive, and preparing for the baby is taking up a fairly large portion of my life at the moment - who knew how much research I could do for a car seat or push chair?! And how much DIY actually needed doing? But at least this has focused me into not actually wasting my time at the hackspace!
I’ve been thinking about kits… As many of you know, we are putting together a MiniPOV kit from Lady Ada for use for a couple of workshops in the next few weeks, more about that another day! But that has got me thinking about other kits we could make, and not just electronic ones.
So over the last couple of weeks I have been building a catapult using the new laser cutter at the hackspace. Now on version 0.3, I thought I would document the story so far…
Version 0.1
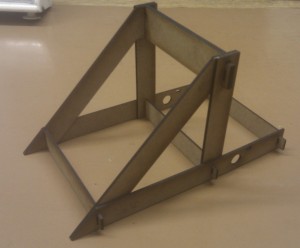
I decided to base the catapult on an Onager, with aspects of a Mangonel. This is a basic frame with a throwing arm linked to the frame using rope. This rope also stores the energy for the throw, torsionally.
But how to make it 3D? I decided to use knock-down tenon joints throughout, so I need to make sure the laser is accurate enough to make this without leaving the whole thing loose. Will I need to makes the holes 10mm and the tenons 11mm just to compensate?
No! As it turns out, the laser cutter is extremely accurate and I can make the tenons and holes the same size and everything fits nice and tight. I built the basic frame as a proof of concept.
Version 0.2
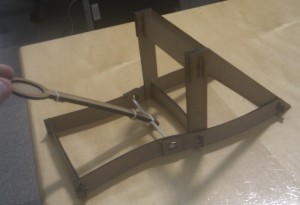
So let’s add a throwing arm! We need it to be spoon-like, but if we just engrave a dip, it won’t be very deep. By cutting two slightly different spoons, one with a whole and one without we can join them to make a spoon-type throwing arm.
I also increased the length of the catapult slightly so the throwing arm won’t catch on the back crossmember.
We now have the torsional rope (string!) and the arm, so we can test it! Using some altoids as ammunition, this version gets nearly 2 metres (around 6 feet), but the projectile is leaving the catapult fairly parallel to the ground, so some improvements need to be made.
Also, as you can see from the photo, the side sections have some severe bowing, which eventually led to a crack when tightened.
Version 0.3
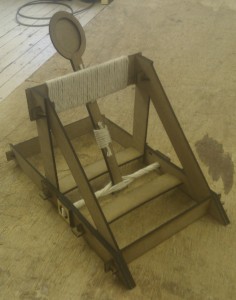
First of all, I moved the torsion pivot further forward past the centre crossmember. This means the throwing arm will hit the stop brace before the vertical rather than after. I’ve also added in another crossmember just after the pivot and turned both this and the centre crossmember to be horizontal.
I’ve also added additional side bracing from the centre to the front to increase the strength.
During initial tests, the winders failed, so I re-cut these out of ply.
With two full turns I managed to get a small metal nut about 3.5 metres (12ish feet) across the workshop! After a few more quarter turns (with my teeth, it was so tight!) it managed 4.5 metres (15ish feet)! Another quarter turn snapped the forward crossmember.
I think Dominic has video of this test, so I will update when it becomes available!
This is as far as I’ve got so far, onto version 0.4. Once I’ve got it sorted, I will release the DXF file on thingyverse and make a kit which will be available from Nottingham Hackspace.